Pages

Friday, May 24, 2019

Kesari Bhaat - Saffron Rice

Kesari Bhaat -Saffron Rice

Ingredients
1 cup rice 
1.5 cups sugar to make a syrup.
2-3 cloves
2 tsp Ghee
1 tsp Saffron
Elaichi powder ( green cardamom powder )
Almonds
Raisins

Procedure
Soak the saffron in 50 cc water and keep aside

In a heavy bottomed saucepan, heat the ghee. Once heated, add the cloves.
Add the washed rice. Saute for a few minutes. Add 1-2 cups water and cook the rice. Add a pinch of salt . Add the soaked saffron while rice is cooking.
Once the rice is cooked, remove from saucepan and spread it out on a big plate.

Place sugar in a saucepan with a 1/2 cup of water and make a syrup. You should be able to make  a small tight ball with a drop of syrup. Turn the heat down to low. 
Add the rice to the sugar syrup. Add Elaichi powder, almonds and raisins. Once you add all this the syrup tends to become a little more fluid. Continue to stir till all the syrup is soaked up by the rice and thickens. 
Cover for 4-5 minutes. Turn the heat off.

Saffron rice is ready to serve. 

Monday, January 11, 2016

Tilache Ladoo


Tilache Ladoo


Ingredients

250 gms Sesame seeds
100 gms raw peanuts
50 gms Dried coconut flakes
250 gms "Chikki Cha Gul" ..a special kind of Jaggery
1 tsp cardamom powder
1 tbs ghee

Procedure:
Toast the sesame seeds on a low flame till they puff up a little.
Toast the peanuts. Once cool, remove the skin. Place peanuts in a grinder and give it a quick whirl to brake into smaller pieces.
Toast the dried coconut till golden brown. Once dry and crisp, crush into a coarse powder.

In a bowl mix together the sesame seeds, peanuts, coconut and cardamom powder. Keep aside. (Optional: Can also add other dried fruits )

For Jaggery Syrup:
Shave/grate the jaggery onto smaller pieces.
Place in a heavy bottomed saucepan on a low to medium heat. Add the ghee. Stir continuously till a syrup forms.
To check correct consistency: add a small drop of syrup to a bowl of cold water. It will quickly cool. Remove from water and form into a small ball. It should be firm. 

Remove the syrup from the stove. Add the sesame seed, peanut and coconut mixture to this. Stir to mix.
Transfer to a platter.
Scoop up a small amount at a time and roll into small ball.

Set aside to cool. They will firm up as they cool.


Saturday, March 24, 2012

HOLI !

Holi is widely known as the festival of colours.
Celebrated throughout India it is a time of merriment and of course great food! My daughters love ( पुरण पोळी) Puran Poli...and couldnt wait to eat them right off the pan...sizzling and dripping with ghee.
Here's how you make this mouth-watering treat.
I make the one known as "tel poli"  तेल पोळी not the readily available "peeth poli" पीठ
पोळी

Puran Poli Recipe

1 cup "चना दाल " split chick peas.
1 1/4 cup grated jaggery
2 cups all purpose flour "मैदा "
Oil safflower/ canola . Do not use olive oil.
Powdered nutmeg
Powdered green cardamom "वेलची "
Salt to taste
Banana leaves or parchment paper.
1 Onion cut across.

For the filling
Soak the chick peas for a couple of hours ( makes the cooking time shorter)
Add water and cook till daal softens and can be mashed into a soft paste. Simmer till most of the water is reduced.
Add the grated jaggery and stir till uniform. (consistency similar to mashed potatoes). It should be a little moist , but not wet or too dry.
Let cool.
If you have a food mill, run it through that so that you get a nice soft even paste.
Add powdered cardamom and nutmeg.

For the covering:
Make a dough of the flour. Pour oil over it till it is immersed in it. Cover and set aside for at least an hour.

Procedure:
Make small balls of the filling and keep.
On a clean table/platform, spread the banana leaf/parchment paper and brush the surface with oil (liberally). In a small bowl, pour  just a little oil ( to coat the bottom)and put the onion( cut side down) in it. (Do not immerse it..this is just the "brush" to spread the oil on your frying pan)
Take a small ball of the dough (make sure you keep the rest immersed under the oil).
With your fingers make a small patty of the dough keeping the middle thicker than the edges. Place the ball of filling in the center and pull up the edges around it to cover the filling completely.
Place this on the banana leaf. (the side where you connected all the edges face down).
With a light touch...with the flat of your fingers slowly start pushing on it till it flattens. Use a well oiled rolling pin and lightly roll it out like a "chapati". Do not rush this step. You want the filling to stay inside. Keep doing this till the flour covering appears almost a transluscent skin over the filling. You should be able to see the filling through it. (Do not be disheartened if you cant get this the first time around).

Heat up your pan. Take the cut onion and dip it in oil. Spread this oil on the hot pan.
Lift up the banana leaf with the "poli" on it. Very carefully invert the leaf over the pan so that the "poli is now on the pan. Peel off the leaf (carefully) from the poli.
The combination of the poli on the pan, with the oil spread by the onion and the sizzling of the banana leaf gives off an aroma that stays with you.
Once you see the covering puff up, you can flip the poli to cook the other side.

Remove from pan and drizzle ghee over it.
Do not stack warm polis over each other...they will stick. Wait till a little cool.
Can stay for 2-3 days in an airtight container. After that, place in fridge. If you want to store it longer you can freeze them. To eat, warm it up, drizzle ghee over it and enjoy!

Enjoy!

Thursday, October 27, 2011

Chivda

Diwali is a time of lights and of course, foods..mainly sweets. Kanole ( कानोले ), Anarse (अनारसे ),..all mouth watering sweet treats. 
To balance these there are spicy treats of Chakli (चकली ) and  Chivda (चिवडा ).
 Here is a recipe for Chivda. Traditionally we use flattened  rice or Pohe (पोहे ).  While visiting my daughter I saw she had a toasted puffed rice cereal ( which I never did see her eat..so I thought why not make Chivda with this ) which worked equally well.

"Chivda" Recipe

Ingredients:
1 box of Trader Joe's Toasted puffed rice cereal or Pohe which is flattened rice.
Olive oil or Canola oil
100-150 gm Peanuts - raw, unsalted and cleaned.
100 gms Golden raisins
100 - 150 gms Cashews - roasted , preferably unsalted. Lightly salted will do.
3-5 Green chillies. chopped. About 0.5 cm in length.
10-12 cloves of garlic finely julienned.
10-12 curry leaves.
1/4 tsp Turmeric powder
1/4 tsp Asafoedita.
1/4 - 1/2 tsp salt
1/2 - 3/4 tsp  sugar

Method.
To a pan, add about 2 tbs of oil. Once the oil is hot add the peanuts and fry till they start to become slightly golden brown. Remove and put on paper towel to drain the oil.
Next add the cashews to the oil and fry till slightly golden brown. Remove.
Alternately you can roast these in an oven.
Next add the green chillies. You will see them blister and change colour. Remove from pan at that point, Do not char.
Next saute the Garlic till golden brown and crisp. Remove.
Lastly fry the raisins. They will puff up and the skin starts to turn whitish opaque. Remove from pan. I fry these last because anything that is fried in the same oil after the raisins ends up tasting sweet.
It is important to fry each of these separately as each of these require different frying times. If you notice the oil getting cloudy or brown, change the oil or else the oil will discolour whatever you fry in it.
If you use Pohe. Roast ( no oil) these slowly on medium heat. They become crisp.

The next step.

In deep bottomed vessel ( should be able to fit the whole box of rice puffs) add a couple of tbs of oil. Once hot add the asafoedita, curry leaves and turmeric. They should splutter.Turn the heat down to low.  Then quickly add all the fried nuts, chillies and garlic and stir. Add some salt and sugar, mix well. Add the toasted rice puff cereal or pohe and mix well all on low heat. The cereal should get a little warm. Turn the heat off and let cool. Enjoy.
To store : let cool before putting in an airtight container.


Saturday, October 22, 2011

Kanole

Diwali is the most important and widely celebrated festival in the Hindu Calender. Preparations for Diwali start almost a month ahead. Different foods are prepared specially for this time. Some are sweet, some are savoury. “Kanole (कानोले ), Laddoo (लाडू ), Chakli (चकली ), Shankarpali (शंकरपाळी ), Anarse (अनारसे ), Chivda (चिवडा )” usually are made at home. Nowadays these are also available in stores. Nothing is better than home-made. This holds true especially for Kanole.
Of these sweets “Kanole” is considered not only special for this festival but is also auspicious.
Making these is a labour of love and skill. They have to be light and the shell has to separate out in layers.
In the old days they used to say that if you dropped a silver rupee ( in the olden days there used to be a rupee made of actual silver) in a “dabba” (steel container) filled with Kanole…you should be able to hear the rupee ring as it hits the bottom. For the younger generation, what it means is that the kanole are so delicate that the rupee literally cuts through them unimpeded as it hits the bottom.

Here’s the recipe for this delicious treat.


Kanole.

1 vaati = ¾ cup= 200cc (approx)

Ingredients:
For Dough
Semolina - fine (Rava - रवा) 3/4 cup , (1 vaati - वाटी, about 200cc volume)
Milk and water mixed about 100 cc (1/2 vaati)
Ghee 4-6 tbs

For "Saaran" ( cannot come up with English equivalent)
Ghee
Cornflour

For Filling
Dried shredded powdered coconut - 1 vaati
Sugar- Fine powdered, sifted.
2 tbs White Poppy seeds
¼ tsp Cardamom powder
¼ tsp Nutmeg powder
Chapati (whole wheat) flour 2 tbs
Ghee

Procedure:
For filling
In a little ghee saute the chapati ( wheat)flour till the colour changes to a pinkish hue. Do not brown. As it cooks it gives off a very pleasant aroma.
In a pan roast the coconut till golden brown. Set aside.
Roast the poppy seeds. Again , they should be a little pinkish. Not brown. Watch carefully.
In a grinder dry grind the coconut and poppy seeds. (after cooling and each separately). Set aside.
Combine poppy seeds, coconut, add the sauteed wheat flour. Add equal quantity of sugar (or according to taste). It is OK to make it a little extra sweet since the sweetness reduces a bit after frying. Add nutmeg and cardamom powder.
Can store in an airtight container.

For the dough
Make a dough with the Semolina, and the milk and water. Can add a pinch of salt to taste. (If you cannot find fine semolina, grind the semolina finer before using it). Cover with a moist kitchen cloth and set this aside for 4-6 hours.
Rub this dough with ghee..generously. For the next step you need a strong base and something heavy like a stone pestle ( Varvanta - paata - Traditionally an implement made of stone ).
On the base keep the dough and pound it with the pestle. If it tears, add more ghee, roll it into a ball and pound flat. Keep doing this till the dough is soft and pliable. Takes about 30 minutes or so. Roll it back into a ball and keep aside under a moist kitchen cloth.

For the Saran
On large plate spread 2 tbs or so of ghee solids. With your fingers flattened to the plate rub it on the plate while spreading it from one end of the plate to another. Keep doing this till the ghee feels smooth and you cannot feel the grainy texture. This incorporates air in to the ghee and its texture changes. To this softened ghee ( looks like softened butter), slowly add cornflour little by little till you get a soft paste. (Consistency of sour cream).
Keep aside under a moist kitchen towel.

Now comes the tricky part. I suggest you have a nice cup of tea, put your feet up before embarking on the next phase.

Take the dough and divide it into 4 parts . Roll each part out to about 0.25 cm thick. With your finger push the dough down to make little troughs in the dough( not holes) close together.
Spread enough ‘saran’ to fill these dents and a thin layer over the dough. Now lift up one side and start rolling it to make a tight roll. Use cornflour so that your hands and the dough don't stick to the base / board. With your hands slowly roll this “roll” on the board lengthening it as you do so. Don't roll it back and forth. Go in one direction only. It should stretch out to almost double its length. Do this with the remaining dough as well.
Now twist off about an inch of the roll (do not cut). Hold both the ends of the little piece and with a twisting motion press it to form a little flattened piece of dough.


Keep doing this. Make sure you keep all the dough covered with a moist cloth at all times.
Once you are done with this step get together a few things.

A rolling pin, a base to roll on. A Ravioli or pastry cutter..’Katni’ . A bowl with equal parts of water and milk ( about ¼ - ½ the bowl.) for sealing the rim of the Kanole.. Cornflour and moist towels.
Roll out each small piece of dough. to form a circle. Roll from the center to the edges, not back and forth. Place the edge of your palm along one semicircle as a guide, place about a tsp or so of the filling on this circle.

Moisten the rim with the water/milk mixture (lightly) and fold over the bottom edge and close it to form a crescent shaped form. Press the edges together firmly with your finger tips pointing away from the center.


With the pastry cutter cut out the excess edge.


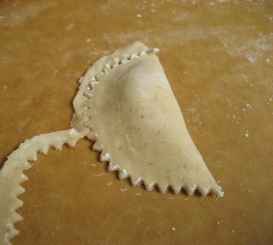
This is what a filled “kanola” looks like.
Keep doing this for all the dough. Again...make sure that you place all these under a moist cloth till you are ready to fry them.

In a deep “kadai” or saucepan, heat up ghee ( be generous- if you are counting calories, this is not the dish for you). The vessel has to be deep so that the Kanole do not touch the bottom.
Once the oil is heated fry each one separately or at the most 2 at a time ( requires patience. if you overcrowd it the temperature drops and they don't cook as well). Flip once. They are done when the layers start to separate.

If the filling leaks out in to the ghee strain the ghee and use it . If you leave it in the ghee it will discolour the rest of the “Kanole”. Don’t be lazy about this step. This will yield about 18- 20 medium sized Kanole.

Place the fried Kanole on a sieve and let drain. Once cool, enjoy!!

I usually make the filling a day before. The next morning I knead the dough and keep aside. In the 4- 6 hours it is kept aside, I make the saran and get the rest of the stuff ready. You can add saffron to the dough when you pound it to give it a little colour. I don’t add artificial food colouring for different colours as I don’t believe in it.

Total time: about 8 hours + (counts the time the dough rests. The + depends on how many you make and the time it takes to fry them.)

After all this is over, it is nearly time for dinner. At our house it has always been Chinese take-out. Don’t know how that came about but the kids loved the combination.

Monday, August 22, 2011

Gokulashtami

Gokulashtami (Lord Krishna's Birthday) is celebrated by everyone all over India. In our family, some women fast for the whole day and break the fast after midnight. (Lord Krishna's Birth time).
Different types of sweets are made for this day. Our family always makes a kheer from shelled wheat.

Shelled wheat is easily available in the stores today, but, I would always remove the shell of the wheat at home, which was a long process. Every year, my mother and I would shell it together and share the shelled wheat as well.

Kids also love this kheer.
It is made in a large quantity and can be eaten over a few days.
I would like to share the recipe for this kheer.


"Gavachi Kheer"  (Kheer made with shelled wheat)

Shelled wheat – 1 cup
Jaggery – 2 cups
Milk -  4 cups
Nutmeg powder – ½ tsp
Velchi powder – ½ tsp
Ghee (Clarified butter) -  ¼ tbs

In a pot, heat ghee. Add wheat and lightly saute it in the ghee for a couple of minutes on a low flame.
Add water and cook till the wheat cooks completely till it is soft.
Add jaggery,  nutmeg, cardamom powder and stir till it thickens.
Let the mixture cool till it reaches room temperature and then add milk (also at room temperature) slowly till you get the consistency that you prefer.
Constantly stir the mixture as you add the milk.
Heat the mixture again on a low flame till it reaches a boiling point and then turn the heat off.
It is now ready to eat.
Enjoy!!

Saturday, August 13, 2011

Narali Bhaat


Today is Narali Punima and it is celebrated all over India and each one makes their own special coconut dish. 

Traditionally I make Narali Bhaat which is made with coconut milk and rice. 

The whole meal is similar to the meals made on shravan Fridays, but the sweet dish served is Narali Bhaat.


Recipe :
Ingredients :
Coconut Milk                             2 cups
Basmati Rice (washed)               1 cup
Jaggery        (grated)                 1 ½ cups
Cardamom                                 ½ tsp
Nutmeg Powder                         1 pinch
Raisins                                       ¼ cup
Almonds (peeled and sliced)        ¼ cup
Ghee (clarified butter)               1 tbsp

Procedure :
Add ghee to a heated pan and add rice and sauté it over a low flame for a couple of minutes. Add coconut milk and fully cook the rice in it. Add more coconut milk if needed to fully cook the rice. All different varieties of rice require different amounts of milk to cook.
Once the rice is cooked, take out in a big plate, spread it and let it cool.
In another pot take the grated jaggery and stir it till it becomes a smooth paste. Once it reaches a boil, take  some in a spoon and pour a drop of the paste in a bowl of water. If the drop is hard when removed from the water, the paste (paak) is ready to use. In Marathi that is called a pakka paak.

Lower the flame and add the rice to this paak. Stir for couple of minutes and add almonds, raisins and cardamom powder. You may add other dry fruits like pistachio and cashew.
Stir this all in the rice for couple of minutes and cover it and let it steam.
The rice is ready to eat!!
Enjoy!!

Thursday, August 11, 2011

Moong Birdha


It’s been a couple of days since I added another blog, but I would like to add the recipe of Moong/Mung Birdha which we made on Monday, which is one of the dishes made for Shravani Somvar.
Ideally I make vaalacha birdha but I haven’t been able to find good vaal in the Indian Grocery stores in the US.

 Moong is a very nutritious bean.  There are 3 main forms of moong found in stores. One is the whole moong (unpeeled), two, the split moong (unpeeled) and the third is the split (peeled) one.
Each one is cooked in a different way, example, if you make spinach vegetable, add soaked (for an hour) split moong, a one inch stick of cinnamon and cook till the dal is fully cooked.
It is healthy, tastes good and the kids love it with white rice and ghee. 

Usually, the first solid food given to infants consists of moong (split – peeled) and rice. The split moong beans are first washed, dried and then lightly roasted on a pan.
They are then ground in a food processor and stored.
You can use a spoon full a day. Cook it well in some water till it forms a nice paste.

But I digress. Getting back to our birdha, I use whole moong, soak it in water for 4-5 hours.
Drain the water and let them sprout overnight.
Once they sprout, soak them in water for about an hour so that the peels loosen up.
After peeling, they are ready to use. I have a picture of the peeled moong along with the birdha.


Recipe :
Ingredients:
Moong Dal (sprouted and peeled)                   1 cup
Onion (chopped fine)                                    ½ cup
Asafetida                                                     1 pinch
Mustard Seeds                                              ½ tspn
Jeera                                                          ½ tspn
Jeera Powder                                              ¼ tspn
Turmeric  Powder                                        ½ tspn
Chili Powder                                               1 tspn
Coconut Milk                                               ¼ cup
Kokum                                                        4 -5 nos
Sugar to taste
Garlic Paste                                                ½ tspn
Green chili                                                 1 no.
Coriander Leaves
Coriander Powder                                       ½ tspn
Fennel Powder                                            ¼ tspn        
Oil                                                             2 tbspn
Water                                                        2 cups

Procedure:
Add oil to the heated pan. Add Asafetida, Mustard Seeds, Jeera and Turmeric powder. Then, add the moong and onion together and stir lightly. Add the water, Chili powder and salt.
Let the water reach a boil. Add jeera powder, coriander powder, fennel powder and garlic paste.
Let it cook till the moong is soft.
Add Kokum, sugar and coconut milk and let it boil for couple of minutes.
Finally add coriander Leaves and green chili as garnish.
Enjoy!!


Sunday, August 7, 2011

Shrimp Fry


Sunday!!  The kids look forward to this day where they get a break from all the sweets and I make a non-vegetarian dish.  Usually it is either fish or shrimp.

We get a variety of shrimp including a dried version called ‘sode’. In Mumbai, we get fresh shrimp from the local City Light market and sode from the coastal region  of Maharashtra ( Konkan). The good thing about buying shrimp at the local market, you can get the fresh shrimp peeled.  

Sea food reminds me of some great times with friends and relatives. Whenever we have guests, they usually ask me to make an appetizer with sode, shrimp, kadya (dried Bombay Duck/ "Bombil" – it’s a fish commonly found in the Indian Ocean) or stuffed pomfret.

Today I added a lot of recipes to my journal. Some of sode, fish and shrimp.
Even the Khichdi that we made on Saturday, can be made with adding sode and a homemade ground garam masala. It tastes awesome!

Today, I would like to share the Shrimp fry recipe with you.
I always use fresh ground garlic, the bottled one does not give the same taste. The same is true for tamarind paste, always use fresh. Soak the tamarind in water and extract the paste from it. The store bought paste has more color and gives a slight bitter taste.
Sea food tastes best with fresh ingredients.


Shrimp Fry :
Ingredients:
Shrimp( Peeled and deveined)    2 pounds
Oil                                            2 tbsn                                                          
Turmeric Powder                       1 tspn
Chilli Powder                             2 tspn
Salt to taste
Garlic Paste( fresh)                   1 tbspn
Fresh garlic cloves                     
(with inner most peel intact)      5 small ones
Tamarind Paste (fresh)              ½ cup
Coriander powder                      ½ tspn
Garam Masala                           1 tspn
Water                                       ¼ cup

Procedure:
Marinate the shrimp for an hour with turmeric powder, chilli powder, coriander  powder, salt, tamarind paste and garlic paste.
Heat the oil in a pan. Crush the garlic cloves and add them to the pan.
Once the garlic is slightly brown, add the shrimp.
Stir the shrimp till it starts to leave a little water.
Add the water and cook the shrimp.
Once the water has evaporated add the garam masala.
Stir the shrimp for a couple of minutes.
Add chopped coriander leaves to garnish.
Enjoy!!


Friday, August 5, 2011

Khichdi

 Friday was a beautiful day here in Naperville; we took the kids to the pool and spent a long time at the pool with some friends. I was wondering if we would get time to make the Saandanya, but it went really fast and they came out really good and tasty.
I did update the blog with a picture of the Saandanya.

I really liked the rice rava (Cream of Rice) we bought here at an Indian Grocery store. The coconut milk was from an Asian store and that too was very nice and thick.
It made me realize that with all these ingredients available in the stores, prepping and cooking takes less time and the food still tastes just as good.

Traditionally, I extract the coconut milk myself which usually takes a couple of hours.
I first grate the fresh coconut, grind it in a food processor and then extract the milk.

Today is Shravani Shanivar(Saturday).
Some people fast on Shravani Shanivar.
The meal to "break the fast" consists of a rice dish cooked along with a lentil (toor dal) which together is called Khichdi. The vegetable is "Maath" (a leafy vegetable) and the sweet on the left side is a bit of jaggery.
Coconut milk or tup (clarified butter) is poured on the Khichdi.

I would like to share the recipe of Khichdi :

Ingredients:
Basmati Rice           1  cup
Toor Dal (unoily)     ½ cup
Onion chopped       ¼ cup
Pearl Onions           5 (peeled and whole)
Asafoetida              ¼ tspn
Turmeric Powder     ¼ tspn
Water                    2 ½ cups
Salt to taste

Procedure:
In a pot add the water, dal, asafetida and turmeric powder.
Let it cook till the dal is half cooked.
Add the Rice, chopped onion, pearl onions and salt to the dal and cook it till the rice is cooked.
Cover and keep for about 10minutes.
Serve with Coconut milk or tup along with the khichdi.
It is simple to make and just as tasty!!
Enjoy!!

Thursday, August 4, 2011

Saandanya

Yesterday, Naagpanchmi was a busy, but fun day. The most amusing part was seeing my grandchildren anxiously waiting for the “shenga” to be done. It feels good to carry on the traditions and to see them enjoy the shengas just as much.

Today, on August 5th, there are 2 occasions.
One, being a Friday it has its own special importance and the other being Shila Saptami.

Every Friday, Goddess Jivati is worshiped, and a special sweet called Aarti is made which is given to all the children in the house.
The foods made for Jivati are Maath (a leafy vegetable), Vaalacha Birdha, Aarti (made with wheat flour and Jaggery), varan(lentil) on rice and mango pickle.

You cannot taste any of the sweets while making them, but have to wait till it is all done and it is first offered to God.

I feel that children develop a lot of patience in this process. It is very hard not to snack or taste anything when it is being prepared and while the aroma of the sweets spreads through the entire house!!

Some people fast for both the occasions.
The foods made for Shila Saptami are Taro Leave roll (alu vadi), Maath (a leafy vegetable), Vaalacha Birdha, saandanya, varan on rice, yogurt on rice and mango pickle.

The famous “Saandanya” is a sweet made from Rice Rava (Cream of Rice), Coconut milk and Sugar.
Traditionally, even the Rice Rava (Cream of Rice) was made at home. The rice was washed and dried. Once it was dried, it was ground in a stone grinder or later in a food processor.
I would like to share this recipe with you today:


Saandanya

Ingredients :
Rice Rava (Cream of Wheat)         1 cup
Coconut Milk                     1 cup
Cardamom Powder             1 pinch
Sugar                               ½ cup
Saffron (optional)               1 pinch

Procedure:
Take 2 tspn of Rava and add about 2 tspn of water and cook it to make a fine paste and keep it aside.
Lightly Roast the rest of the Rava in a pan till it warms up. Remove the pan from the heat.
Add the paste made earlier, mix it evenly, cover the pan and leave it aside for 15-20 mins.
Then add Coconut milk, sugar and cardamom powder, mix it well and let it soak for an hour.
Take a flat plate with a rim and grease it with some tup ( clarified butter) , pour the mixture in it and steam it.
Once it is cooked, make cuts to form diamond shaped Saandanya. Let it cool.
Remove the diamond-shaped Saandanya.
A few colored ones are made by adding saffron along with the coconut milk.
Enjoy!!